Measuring Rake Angle

Rake angle is the angle between the cutting tool bit and the cutting chips. This has a large effect on cutting resistance, emission of cutting chips, cutting heat, and service life. Checking and controlling the cutting tool rake is crucial to ensure for proper machining action. With that said, rake angle can be difficult to measure with conventional tools. This article explains basic knowledge about rake angle and introduces the latest technology used to take accurate rake angle measurements.
- Rake Angle
- Positive and Negative Rake Angle in End Milling
- Relationship Between Cutting Tool Angle, Rake Angle, and Relief Angle
- Problems in Conventional Rake Angle Measurement
- Solution to Problems in Rake Angle Measurement
- Summary
Rake Angle
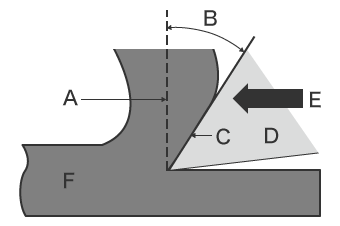
A tip mounted on the end of the cutting tool bit has a rake angle designed to allow the cutting chips to flow out while cutting the workpiece. The rake angle is the angle formed between the cutting target workpiece surface (reference surface) and the surface (rake surface) on which cutting chips flow away when the cutting tool abrades the target workpiece.
- A
- Reference surface (cutting chips)
- B
- Rake angle
- C
- Rake surface
- D
- Tip (cutting tool bit)
- E
- Cutting direction
- F
- Workpiece
For reference, the angle of the tool bit edge is called the cutting tool angle. The surface on the opposite side (lower side in the figure) from the tip (cutting tool) rake surface is called the relief surface. The angle it forms with the workpiece is called the relief angle. This is the angle required for avoiding interference between the tool and workpiece.
Positive and Negative Rake Angle in End Milling
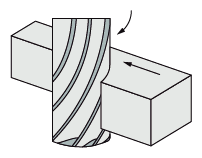
End mills are used to form shapes and holes during milling and can cut a variety of materials in several directions. The end mill is generally described as a positive shape or negative shape according to the rake angle of the tool bit.
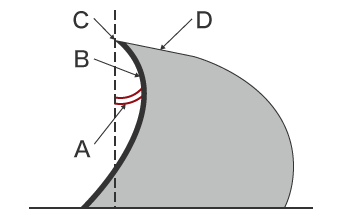
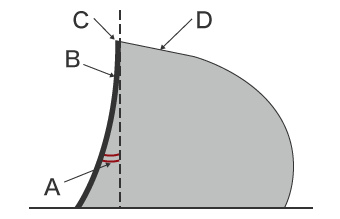
In most cases, a positive shape with less cutting resistance to the tool bit is selected. With that said, an end mill with a negative rake might be used when cutting hard work pieces such as high hardness steel, where tool bit strength is required. See the differences between positive shape and negative shape below.
Positive shape
- A
- Rake angle = Positive
- B
- Rake surface (back side of tool bit)
- C
- Tool bit edge
- D
- Relief surface
- Characteristics of positive rake angle
-
- The cutting blade is sharp and cutting resistance is small.
- Excellent cutting surface roughness can be produced even when machining at low speed.
- Suitable for soft materials or workpieces that are easily machined (copper, aluminium, stainless steel, plastic, raw material, heat-treated steel).
Negative shape
- A
- Rake angle = Negative
- B
- Rake surface (back side of tool bit)
- C
- Tool bit edge
- D
- Relief surface
- Characteristics of negative rake angle
-
- When machining at low speed, cutting resistance is high but the cutting surface roughness is reduced.
- When machining at high speed, excellent cutting surface roughness is produced.
- Suitable for hard materials where chipping is likely to occur (high hardness steel or cast iron).

With a ball end mill that has a hemispherical tip, the core of tool bit can be made thicker by using a negative shape for the tool bit helix angle. This makes it possible to deliver high rigidity.
Relationship Between Cutting Tool Angle, Rake Angle, and Relief Angle
During the cutting process, a cutting tool (typically a hard metal tool), digs into a workpiece to cut, shape, and remove materials.
Not only do you need to take in account the cutting tool angle, but also need to ensure that the rake angle is properly set up so that cutting chips flow out in the right direction. Along with that, the relief angle needs to be set properly to prevent tool contact with the finished surface after cutting. The primary relationships between each angle are summarised below.
Cutting tool angle
When cutting materials with high hardness, it is important to increase the cutting tool angle. With that said, if the cutting tool angle is too small, chipping or cracking may occur. When cutting soft material or materials with a high welding property, you will want to decrease the cutting tool angle in order to improve cutting performance.
Rake angle
The rake angle determines the chip thickness and flow direction.
The larger the rake angle, the smaller the shearing angle of the chips. As shearing angle decreases, the chips become thinner. This reduces the cutting force and cutting temperature which ultimately reduces tool wear. With that said, if the rake angle is too large, it could reduce the strength of the tool edge causing it to crack when machining hard materials.
For cutting hard materials, you will want to use a tool that has a negative rake angle as explained in the example above. A negative rake angle could cause chips to flow onto the surface of the workpiece causing it to cut the material in places that are not wanted. These chips on the rake surface are called dead metal. Caution is required when using this type of tool because it may affect the chip production conditions, tool service life, and finished surface roughness.
Relief angle
The relief angle is required in order to prevent interference between the tool and workpiece. Too large of a relief angle will reduce the cutting tool edge strength, making it more susceptible to mechanical shock. With that said, a large relief angle does not produce an expanding wear width on the relief surface even when wear progresses. This has the advantage of making chattering vibration less likely. When cutting ductile materials (such as aluminium alloys), increasing the relief angle will make it less likely that chips will adhere to the relief surface.
The angle at each part of the tool is closely related to the workpiece machining efficiency, accuracy, finish quality, and the service life of the tool. Because variation may occur in these angles due to tool wear, tool shape measurement is extremely important for maintaining and improving machining quality and machining efficiency.
Problems in Conventional Rake Angle Measurement
Accurate measurement of the rake angle is extremely important because an improper rake angle may cause tool wear, dead metal adhesion, finished surface roughness failure, and reduced service life of the tool.
For conventional measurement of the rake angle, a profile measurement system or microscope is used. However, these methods involve the following problems.
Problems in rake angle measurement using a profile measurement system

A profile measurement system measures and records the profile of a target by tracing its surface with a stylus.
In recent years, profile measurement systems have been developed to use a laser instead of a stylus to measure complex shapes by tracing the profile in a non-contact manner. Some models are even able to perform measurement of both the top and bottom surfaces.
Measurement of the tool rake angle using a profile measurement system involves the following problems.
- Because the angle is too small, the stylus may disconnect from the target and it may not be possible to measure the correct value.
- When repolishing of the rake surface is performed, it is difficult to judge whether the adjustments were effective when measurement evaluations are done on a line.
Solution to Problems in Rake Angle Measurement
With ordinary measuring machines, much time may be required in order to fasten the target using a jig. In addition, because measurement is done by point or line contact on a three-dimensional target or area, there is the problem of selecting the target or measurement points.
To resolve these measurement problems, KEYENCE has developed the 3D Optical Profilometer VR Series.
This tool accurately captures the 3D shape of the entire target surface without contacting the target. It also measures the 3D shape by 3D-scanning the target on the stage in as little as one second with high accuracy. It is capable of instantaneous and quantitative measurement with no errors in the measurement results. This section introduces some specific advantages of the VR Series.
Advantage 1: Non-contact 3D shape measurement is possible with excellent angle characteristics.
Conventional measuring instruments are limited to capturing points or lines using a stylus probe. This makes it difficult to measure targets that have sharp angles, are small, or have complex shapes.
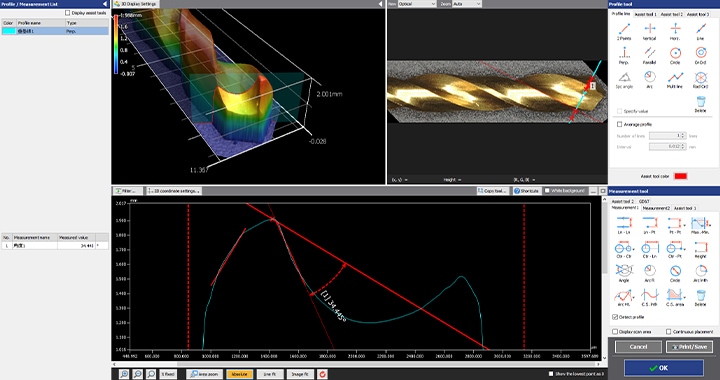
With the VR Series, the full surface of a part can be instantly scanned allowing for non-contact 3D shape measurement. This allows for excellent rendering of the target angle characteristics by being able to instantly capture accurate profile data for the entire 3D shape. In addition, the VR provides a lot of advantages for measurement of tools such as end mills where the shapes and angle characteristics are fine and complex.
Advantage 2: Measurements are Traceable to National Standards.

The VR Series instantaneously and accurately scans the target shape to measure it.
Measurement results are based on a traceability system that is linked to a national standard.
The XYZ traceability-compliant gauge is linked to the standard scale of a JCSS-certified laboratory, allowing accurate on-site calibration to be performed at any time. This ensures high-reliability measurement that is consistent with the standard.
Summary
With the VR Series, the target 3D shape can be measured by instantaneous, non-contact scanning. The rake angle of the tool that is required for proper machining can be easily and accurately measured simply by placing the tool on the stage and clicking a single button. The advantages of using the VR Series include the following.
- Unlike conventional contact-type measurement systems, the VR Series can perform accurate measurement regardless of the target shape or size, or the angle characteristics of the measured location.
- Measurement results are traceable to national standards ensuring reliable shape measurements. This is something that is deemed impossible with a digital microscope. Along with that, the system can be easily calibrated at any time.
In all, the VR Series can instantaneously and accurately measure tool shape, including rake angle improving on machining quality, efficiency, and the tool service life.
It can also measure the accurate 3D shape of machined workpieces in addition to tools. The VR Series can be described as a tool that dramatically improves the efficiency of all related work processes in the machining workplace, as well as quality and productivity.


