Instantaneous and Accurate Measurement of Complex Welding Bead 3D Shapes

Welding is a method of joining two materials (base metals) at joints by using energy such as heat or pressure, with or without the use of a filler metal. Welding beads, created at the welds, are extremely important parts that have a large effect on joint strength and product quality. Based on the welding bead shape, it is possible to evaluate whether or not the weld was made properly, and whether any flaws or defects are present. In order to correctly evaluate a welding bead, it is necessary to quantitatively measure its complex 3D shape, and this involves a number of problems.
This page explains basic knowledge of welding beads and the latest method of easily and instantaneously obtaining accurate measurements of welding bead 3D shapes.
- Welding Beads
- Optimal Welding Bead Dimensions and Shape
- Welding Bead Shape Defects
- Solutions for Measurement of Welding Bead Shapes
- Summary: The VR System provides Dramatic Improvement in Measurement of Welding Bead Shapes That Were Previously Difficult to Measure Accurately
Welding Beads
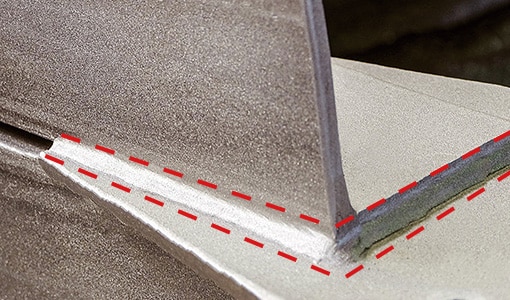
When base metals are joined by arc welding, laser welding, or similar means, the welding beads are convex, rounded parts that are created on the surface at the joints. Because welding beads are formed in a string shape, the process is sometimes called stringing.
When manufacturing metal pipes for various purposes, the welding bead is formed by high-frequency welding at the joint of the base metal after roll forming. With various other welding methods, the joint where the metal and base metal are melted is still called a welding bead even when there is almost no rising shape.

Optimal Welding Bead Dimensions and Shape
This section explains the welding bead shape for the typical welding method of arc welding.
The welding bead shape is correct when it satisfies the prescribed dimensions.
Prescribed welding bead dimensions and shape
The optimal welding bead dimensions are standardised, and it is important that the requirements be met welding bead shape during the development, design, processes, and the production process.
Below are a few common prescribed dimensions:
- Throat Thickness - The minimum thickness of the welding bead.
- Penetration Depth - The distance from the peak of the melted base metal to the surface of the base metal.
- Leg Length - The minimum length from the weld root at the base of the joint to the weld beak toe.
For example, in the weld shown in the figure below, the judgement standard for optimal bead width is whether or not the leg length is 80% or more of the thinner base metal thickness. When the thickness of the thinner base metal is 20 mm, a leg length of approximately 16 mm is required, and this determines the bead width.


Welding bead dimensions and welding current
In arc welding, the welding current is one factor which affects the welding bead dimensions. Larger current produces larger beads, while smaller current produces smaller beads. If the welding bead does not satisfy the required dimensions or shape, it is necessary to correct the welding conditions such as the welding current or torch movement speed.
Welding Bead Shape Defects
In addition to dimensions, there are a number of defects that require attention in the welding bead surface shape. Here with the use of illustrations, we will explain some typical welding bead defects, and their causes.
Overlap
- [Phenomenon]
- Overlap refers to conditions when the molten metal that overflows onto the surface of the base metal cools and solidifies as a welding bead without fusing with the base metal.
- [Cause]
- Overlap is caused by low welding speed and excessive supply of weld metal. Overlap in a fillet weld is caused by dripping of excess molten metal caused by gravity.
-

Underfill
- [Phenomenon]
- Underfill is when there is not enough filler metal in the weld, making the total thickness of the weld less than the thickness of the base metal.
- [Cause]
- Underfill is caused by incorrect welding conditions (welding current or speed).
-

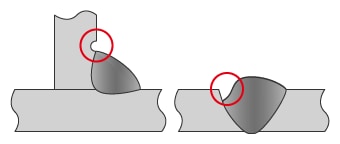
Undercut
- [Phenomenon]
- Undercut is a groove which forms at the weld toe when welding on base metal or a previous weld.
- [Cause]
- Undercut is generally caused by excessively high welding current or welding speed.
-

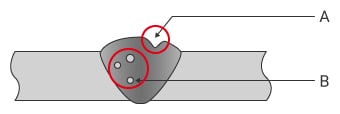
Pits
- [Phenomenon]
- Pits are surface defects produced when gas cavities form inside the weld metal, solidifying and creating a hole in the bead surface when the gas escapes. Gas cavities that solidify inside the welding bead are internal defects called blowholes.
- [Cause]
- The causes of pits include problems with the shielding gas; insufficient deoxidiser; oil, rust, plating or other matter adhering to the surface of the base metal groove; and moisture contained in the material.
-

- A
- Pit
- B
- Blowholes
Cracking (welding bead and base metal surface)
- [Types and phenomena]
- Cracking refers to cracks that form in a hot weld immediately after welding. Cracking is broadly divided into solidification cracking and liquation cracking. Solidification cracking occurs when the weld solidifies. Liquation cracking occurs in multi-layer welds when the previous welding layer is melted by subsequent welding. Depending on the location and shape, cracks are classified as longitudinal cracks, toe cracks, transverse cracks, or crater cracks.
-

- A
- Longitudinal crack
- B
- Toe crack
- C
- Transverse crack
- D
- Crater crack
In addition to the defects that can be identified from the shape and appearance, there are other defects which affect the joint strength.
- Incomplete Penetration - when weld penetration does not reach the required depth due to insufficient heating
- Incomplete Fusion - when the molten metal does not fuse with the base metal at a particular location.
Because these are internal defects, inspection using cross-section samples is necessary.
Solutions for Measurement of Welding Bead Shapes
Inspections are essential for ensuring the quality of welding beads. Visual comparisons using good product samples and gauges require a high level of skill and much time, and judgement may vary depending on the person. Due to the system and accuracy, automated inline inspection machines are in many cases not suitable for purposes such as use during the R&D stage, testing for deciding the welding conditions, sampling inspections, or 100% product inspection of multiple products produced in small lots.
To resolve these welding bead measurement problems, KEYENCE has developed the 3D Optical Profilometer VR Series.
The VR Series accurately captures the 3D shape of the entire target surface without contacting the target. It also measures the 3D shape by 3D-scanning the target on the stage in as little as one second with high accuracy. It is capable of instantaneous and quantitative measurement. This section introduces some specific advantages of the VR Series.
Advantage 1: Complete measurement in as little as one second. The 3D shape of the entire target surface can be captured accurately with a single measurement.
The VR Series instantaneously acquires surface data (800,000 data points with a single scan) in as little as one second. This enables highly accurate and instantaneous measurement and quantitative evaluation of the 3D shapes for complex welding beads.
The maximum and minimum surface irregularities can be displayed in an easy-to-understand manner in a colour map, making it possible to identify the locations of defects. It is also possible to acquire detailed profile data simply by specifying any desired location on the target, such as the locations of defects.
Even after measurement, profile data for other areas can be acquired from past 3D scan data, eliminating the need to scan the target again. Furthermore, measurement data from multiple targets can be compared side by side, and the desired conditions can be applied to multiple data sets at once. This results in a dramatic reduction in man-hours and improved work efficiency.

Advantage 2: Operation is easy and measurement can be performed by anyone with not measurement variation due to operators.
3D shape measurement can be performed easily just by placing the target on the stage and pressing a button. This series includes the industry’s first Smart Measurement function that automatically configures the measurement range and moves the stage according to the target size. This eliminates the work that would be required to set the measurement length and Z-range.

The wide variety of assist tools allows simple and intuitive configuration of the desired measurement conditions.
In addition to easy configuration, the assist tools allow the system to be operated easily even by novices, making it possible even for operators who are unfamiliar with measurement to perform accurate measurement in as little as one second. As a result, the number of samples can easily be increased not only for R&D and testing to decide conditions, but also for measurement and inspection of products during commercial production.


Summary: The VR System provides Dramatic Improvement in Measurement of Welding Bead Shapes That Were Previously Difficult to Measure Accurately
The VR Series can measure 3D target shapes accurately and instantaneously by high-speed 3D scanning without contacting the target. Difficult measurement such as identifying complex irregularities in 3D welding bead shapes and identifying defects can be completed in as little as one second. The VR Series can solve all the problems involved with conventional measuring instruments.
- Abnormal locations on a welding bead can be visualised in a colour map.
- Once a scan is completed, profile measurement of any part and comparison of multiple data sets can be performed at any time.
- Without the need for positioning or other preparation, measurement can be performed simply by placing the target on the stage and pressing a button. This eliminates the need to assign a specialised operator for measurement work.
- Because 3D shapes can be measured easily at high speeds with high accuracy, a large number of samples can be measured in a short time. This is useful for quality improvements.
- This eliminates variation resulting from human factors, making true quantitative measurement possible.
This system allows comparisons with CAD data and easy data analysis such as distribution within tolerances. It can be used effectively for a wide range of purposes including research and development, determination of welding conditions, sampling inspections, 100% inspection of small lot products, and manufacturing trend analysis.


