Observation and Quantitative Evaluation of Wiring Harnesses and Crimped Connectors
With the increasing demand in response to the advancement of electronics for electronic devices, automobiles, and similar applications, wiring harnesses are now required to have higher functionality and quality such as smaller and lighter bodies.
This section introduces the appearance inspection points indispensable to ensure the quality of wiring harnesses and new examples of using KEYENCE’s latest 4K Digital Microscope, which improves the work efficiency of magnified observation and quantitative measurement, inspection, and evaluation.

- Wiring Harnesses Having Higher Importance and Requirements
- Terminal Connection and Appearance Inspection of Electrical Wires, Which Are Keys to Quality
- Latest Examples of Appearance Inspection and Evaluation of Wiring Harnesses
- Depth composition that brings three-dimensional objects into full focus
- Warpage measurement of wiring harnesses
- Crimped core wire observation unaffected by glare from the metal surfaces
- Magnified imaging of crimped connectors of wiring harnesses
- Free-angle observation system, which streamlines observation of three-dimensional objects
- 3D shape analysis, which quantifies evaluation of crimp terminals
- Automatic measurement of crimped wire cross sections
- The Latest Tool for Quickly Responding to Market Demands
Wiring Harnesses Having Higher Importance and Requirements
A wiring harness, also known as a cable harness, is a component that bundles wires that electrically connect electronic devices to transmit power or signals. The ends of wires are fitted with connectors to simplify connection and prevent incorrect connection. 500 to 1500 wiring harnesses may be used in a single automobile, working like blood vessels and nerves in human bodies. Any defects and breakages of wiring harnesses can greatly affect product safety as well as quality and performance.
In addition to the recent technologies that make electrical and electronic products smaller and denser, there have been technological breakthroughs in the automotive industry, such as electric vehicles (EVs), hybrid electric vehicles (HEVs), and the drive assist function and autonomous driving that use sensor technology. These technological improvements have increased demand for wiring harnesses, and it is now necessary to research, develop, and manufacture products that meet various requirements such as a greater variety of types, smaller bodies, lighter bodies, higher functionality, and higher durability. In response to such requirements, new products and improved products need to be supplied to customers with high quality and speed, which consequently requires accuracy and speed for evaluation in R&D and appearance inspection in the manufacturing process.
Terminal Connection and Appearance Inspection of Electrical Wires, Which Are Keys to Quality
In wiring harness manufacturing, one of the processes important to ensure quality is the connection of terminals to wires, which is performed before assembling of parts such as connectors, tubes, protectors, clips, and clamps. The typical terminal connection process uses crimping, pressure-contact, or solder. In any method, defective connection can cause problems such as defective continuity and displaced core wires.
One quality inspection for wiring harnesses is to check for electrical disconnections and short-circuits using a continuity tester.
To inspect detailed conditions and identify causes after tests or when a problem occurs, it is important to inspect and evaluate the appearances of terminal connections by magnified observation using microscopes. The following sections introduce the appearance inspection points in each connection method.
Appearance inspection points for connection by crimping
The wire and sheath are crimped with respective barrels of the terminal, which uses the barrels’ plasticity. The barrels are bent by crimping with a tool or automatic machine on a production line.
- [Appearance inspection points]
-
- (1) Core wire protrusion
- (2) Core wire projection length
- (3) Bell mouth amount
- (4) Sheath projection length
- (5) Cutoff length
- (6)-1 Bend up/(6)-2 Bend down
- (7) Twist
- (8) Rolling
-

- TipsCrimp height, a criterion to determine the crimping quality of terminals
- Crimp height is the cross-section height of a core barrel or sheath barrel after crimping. Failure to crimp to a specified height causes defective continuity or displacement of the wire.
-
Pass/fail examples of crimp height of the sheath 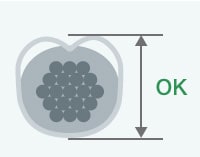
Non-defective (within specified tolerances) 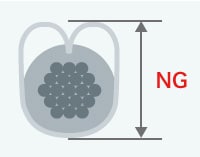
Poor crimping 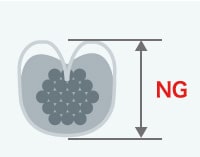
Excessive crimping - A crimp height larger than the specified height causes the wires to be disengaged when pulled, due to poor crimping. On the other hand, a crimp height smaller than the specified height causes the barrel to dig into the core due to excessive crimping, thereby leading to wire damage.
- Crimp height is simply a judgement criterion used to estimate the conditions of the sheath and core wire. In recent years, wiring harnesses have become smaller and have been made of an increased variety of materials. To detect all defects that occur in the crimping process, the conditions of the core wires need to be inspected quantitatively on cross sections of crimp terminals.
Appearance inspection points for connection by pressure contact
A terminal used in this method is connected by squeezing a sheathed wire into a slit. When the wire is pushed into the slit, the blade on the slit strips the sheath to establish a connection. Sheath stripping can be done at the same time.
- [Appearance inspection points]
-
- (1) Wire overrun
- (2) Clearance at the wire tip
- (3) Conductor protrusion at the front or rear end of a pressure contact piece
- (4) Displaced pressure contact centre
- (5) Scratch on a housing
- (6) Scratch on or deformation of a pressure contact piece
- A: Housing
- B: Pressure contact piece
- C: Wire
-
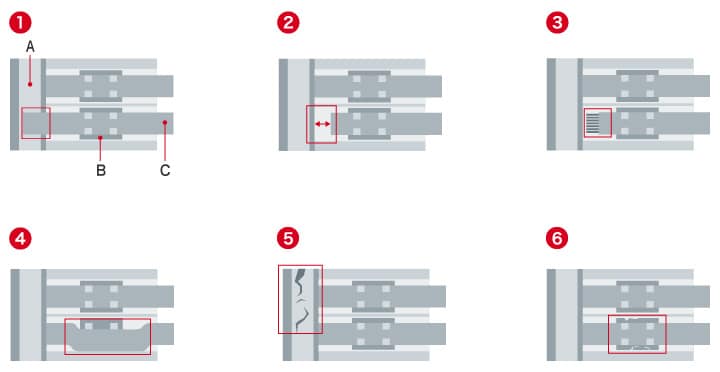
Appearance inspection points for connection by soldering
There are two typical methods: one is solder pot, in which the wire is inserted into a terminal, and the other is eyelet, in which the wire is passed through a hole.
- [Appearance inspection points]
-
- (1) Core wire protrusion
- (2) Defective soldering continuity (insufficient heating)
- (3) Solder bridge (excessive soldering)
-

Latest Examples of Appearance Inspection and Evaluation of Wiring Harnesses
As wiring harnesses are becoming increasingly smaller, it is becoming increasingly difficult to inspect and evaluate their appearances through magnified observation.
KEYENCE’s VHX Series high-definition 4K Digital Microscope enables quick high-magnification observation and inspection.
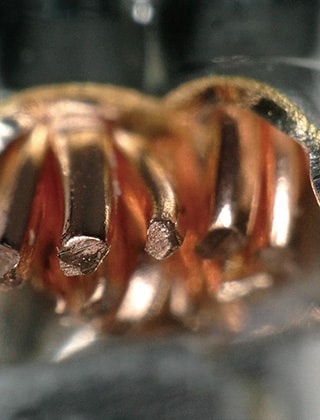
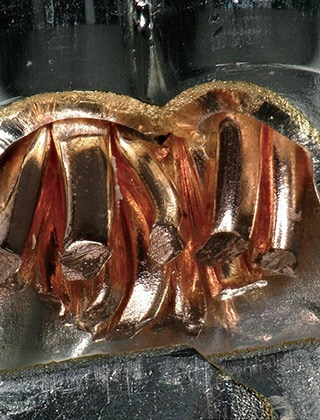
Depth composition that brings three-dimensional objects into full focus
It is not possible to fully focus on three-dimensional wiring harnesses, which makes complete and comprehensive observations and evaluations difficult.
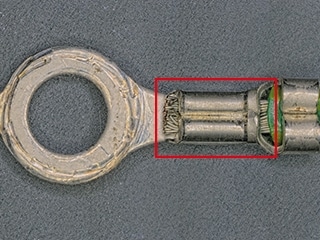
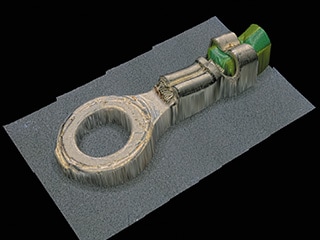
The real-time composition of the VHX Series 4K Digital Microscope automatically composes the depth, thus enabling correct and efficient magnified observation, appearance inspection, and evaluation with high resolution images that are fully focused on the entire target.
Warpage measurement of wiring harnesses
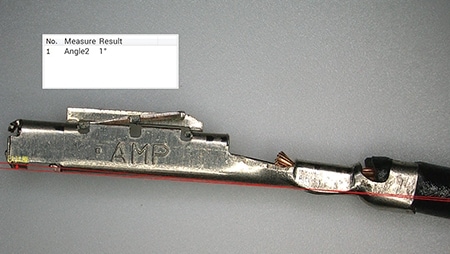
Conventional warpage measurement requires multiple measuring instruments in addition to microscopes. This inevitably lengthens the measurement processes, requiring more effort and time. In conventional measurement there are also problems regarding work efficiency and reliability because measured values need to be processed before they can be recorded as data.
The VHX Series 4K Digital Microscope has a wide range of 2D measurement tools, which enables measurement of various points, such as wiring harness angle and crimp height of crimp terminal cross sections, with simple operations. Such tools allow users to quantify measurements and store and manage data, including images, values, and imaging conditions, thus dramatically improving work efficiency. Images stored in the album can be selected to measure different locations and points later.
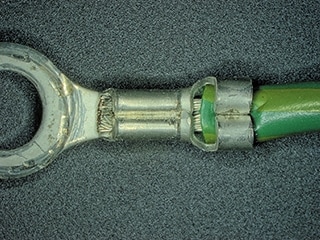
Crimped core wire observation unaffected by glare from the metal surfaces
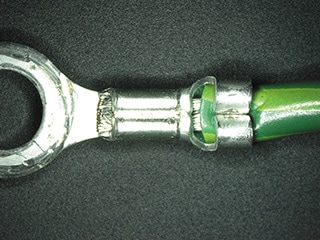
Observation can be difficult due to reflection from metal surfaces.
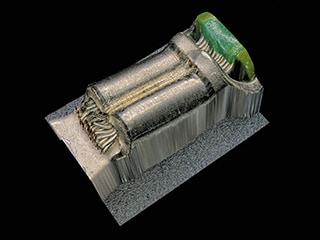
With the glare removal function and ring reflection removal function, the VHX Series 4K Digital Microscope removes reflection from glossy metal surfaces, making it possible to accurately observe and understand the crimping conditions of the core wire.
Magnified imaging of crimped connectors of wiring harnesses
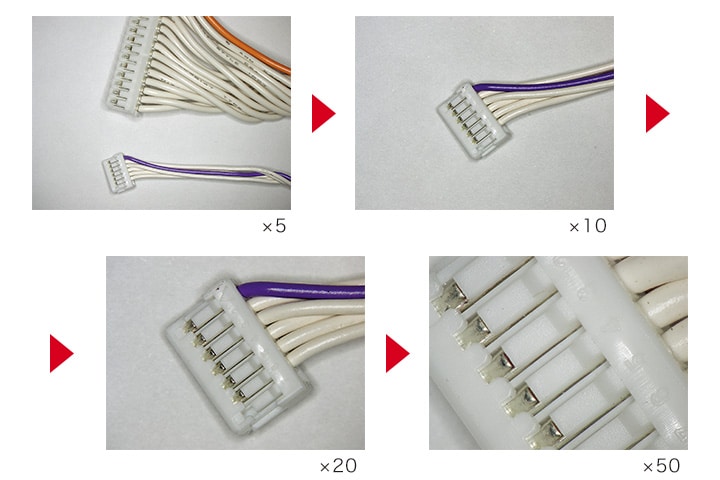
In conventional appearance inspection, it is difficult to focus on and observe small targets, such as three-dimensional crimped connectors of wiring harnesses.
The motorised revolver and high-resolution lenses of the VHX Series 4K Digital Microscope enable a seamless zoom function that automatically switches magnification from 20x to 6000x. This enables quick magnified observation with a mouse or handheld controller.
Free-angle observation system, which streamlines observation of three-dimensional objects
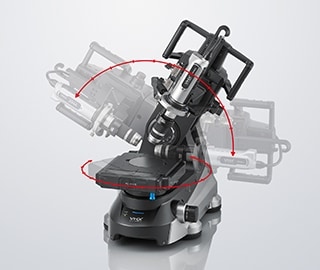
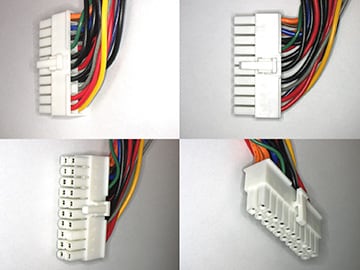
In conventional appearance observation of three-dimensional products, such as wiring harnesses, targets need to be fixed at different angles and focusing is required for every such angle. It is, however, still difficult to focus on an entire target, and targets cannot be fixed at certain angles.
The VHX Series 4K Digital Microscope uses a free-angle observation system and a high-accuracy XYZ motorised stage, thus supporting flexible movements of the head and stage.
3-axis adjustment mechanisms enable easy field-of-view alignment, rotation, and oblique axis motion, allowing users to observe from any angle. Furthermore, eucentric design ensures that the target stays centred in the field of view, even if the lens is tilted or rotated, making appearance observation of three-dimensional targets much more efficient.
3D shape analysis, which quantifies evaluation of crimp terminals
In conventional appearance observation of crimp terminals, it is necessary to focus on each part of a three-dimensional target. Furthermore, such observation cannot eliminate the issues of defects going undetected and variations in evaluation occurring among operators. Moreover, there was no other way to perform evaluations than to use 2D measurements even for three-dimensional targets.
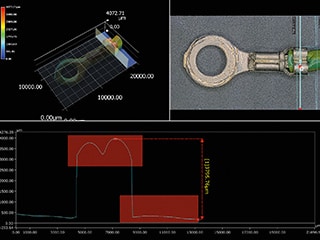
The VHX Series 4K Digital Microscope not only allows for magnified observation and 2D measurements using clear 4K images but also is capable of capturing 3D shapes and performing 3D measurements and profile measurements of selected cross-sections. 3D shapes can be analysed and measured with simple operations, regardless of the skill level of the operator, which enables advanced and quantitative appearance evaluation of crimp terminals with higher work efficiency.

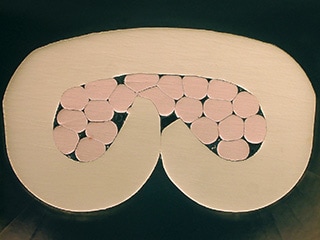
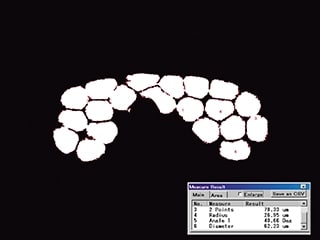
Automatic measurement of crimped wire cross sections
The VHX Series 4K Digital Microscope has a wide range of measurement tools, allowing users to perform various automatic measurements on a captured cross section image.
For example, as shown in the following images, the area of the wires can be automatically measured on the cross section of the crimped core wire. This allows users to inspect the conditions of the crimped wires quickly and quantitatively, which cannot be achieved by crimp height measurement and cross-section observation.
The Latest Tool for Quickly Responding to Market Demands
In response to increased demand and advanced market requirements for wiring harnesses, it is necessary to establish R&D, quality improvement, and manufacturing processes on the basis of data from speedy and accurate inspections.
The VHX Series high-definition 4K Digital Microscope offers excellent efficiency and ensures high-accuracy observation, analysis, measurement, and evaluation with just one machine. Equipped with many other advanced functions, the VHX Series can be an effective tool for industries that require both quality and speed.
For details on the VHX Series, click the button shown below to download the catalogue. For inquiries, click the other button shown below to contact KEYENCE.


